Tonight, after painting the closet for hours, I opened one of the ales I bought last time we went to the grocery store. Then I made chocolate-chip cookie dough (baking will come later) for Thanksgiving.
The inevitable clash happened when I had the first taste of cookie dough and realized that the beer just didn't have the same appeal any more.

Tuesday, November 21, 2006
Seeing Stars Again
My first bit of press. So exciting. Many thanks to Jules of ikea hacker.
My full directions for this project are here...
Yesterday, I realized there was one more thing in the office left undone, so I drywalled the closet... (cue music now)... All By Myself. I am so proud of my inner contractor. Now I have only to primer and paint the closet, and together we must cut and paint the molding and trim for the room, and hang a few shelves... and then we're done. The holiday weekend and impending obligations may or may not interfere, but I think we're in single digits now, so that I should still be back in the office by the beginning of next week. What a relief it will be to really get back to work, and to have all of my supplies at my fingertips again.
Not to mention having the rest of the house back from its current state as storage facility.
Monday, November 20, 2006
So close...
We finished laying the floor last night and now we have only to cut and paint molding and window trim and put up outlet covers, etc. We'll most likely do this on Friday, and I should be back in the studio before the weekend is over. I am so excited.
The floor looks absolutely gorgeous.
Of course, now I'll need new furniture. I'm refinishing one storage item right now, about which I am very, very excited. I'll post pictures of that when it's in place.
Next, once we have all of the debris out of the garage, I want to build a custom painting table. Since I have no experience building furniture (if you don't count trying to make a prefab desk that didn't work, work), I want to keep it as simple as possible for now, so I think I will start with something like this. I'd like to add another drawer and I'd like to extend the top out further so it is more of a desk than a table. But I like the basics of it very much and it will give me an excuse to use the new miter saw and the table saw I talked Al into buying (as if he needed that much persuading... but he was trying to stick to the budget while I just kept insisting it would pay for itself. I think it already has).
Ways to Entertain Yourself
 Popular Mechanics
Another class of projects illustrate the caviler [sic] attitude toward environment and health in 1913. These projects involve items such as gunpowder, acetylene, hydrogen, lead, mercury, sulfuric acid, nitric acid, cadmium, potassium sulfate, potassium cyanide, potassium ferrocyanide, copper sulfate, and hydrochloric acid. Several involve the construction of hazardous electrical devices. Please view these as snapshots of culture and attitude, not as suggestions for contemporary activity.
Still, there are also some very fun and potentially useful projects, including a secret door lock, an igloo, kites and boomerangs, your own backyard merry-go-round, scores of sleight-of-hand magic tricks, a toboggan, and a homemade butter churn, about which the contributor says:

Tuesday, November 14, 2006
Out of the Box
My mom said to me on a recent visit, "I wish I were creative like you."
I know for a fact that my mother is creative -- I've seen evidence of it in her home. And I believe everyone is creative naturally, but some people just don't know how to access that creativity.
So I decided to give my mom some tools to jump-start her creativity and I concocted a gift for her:
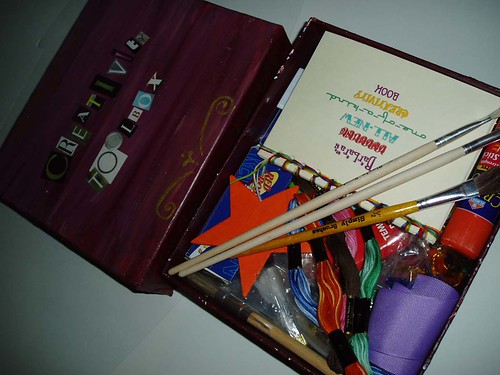
I put a quote in the bottom of the box by Wassily Kandinsky:
There is no must in art because art is free.

I raided my own stash of supplies for sequins, embroidery thread, and other embellishments. I added new paints, brushes and a palette tray.
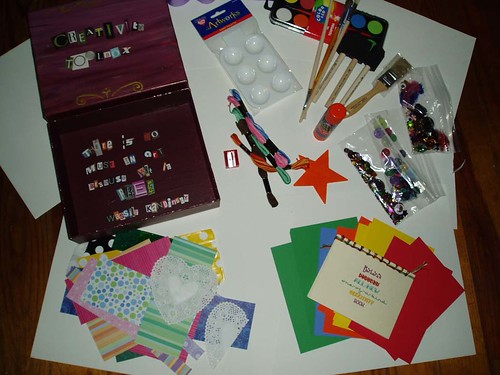
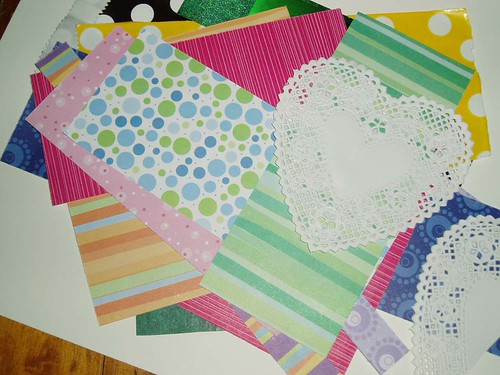
I picked out some fun and pretty papers:
And then I made her a guidebook.
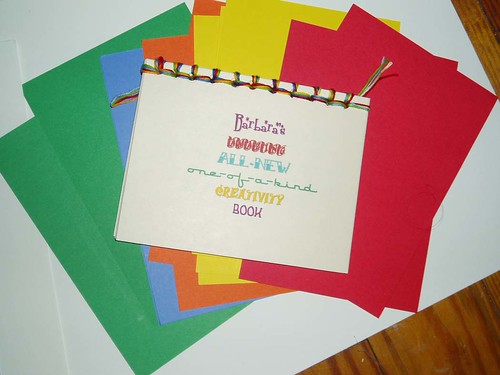
I threw in some more quotes from famous artists and added some tips on how to be creative:
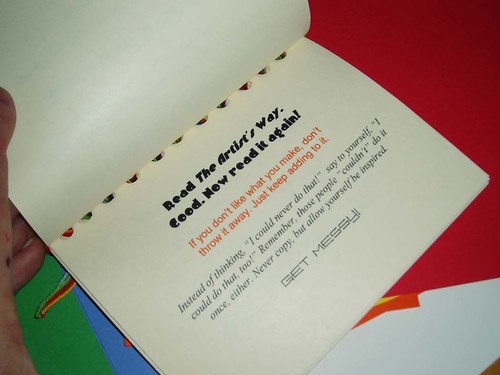
And I made up some "rules."
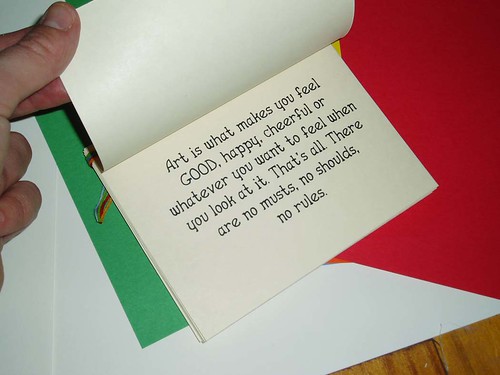
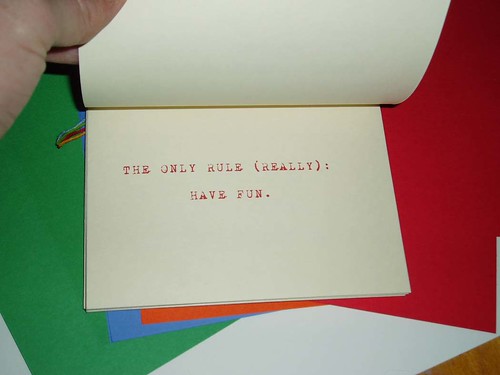
I don't know if she'll ever use it, but I think she really liked it.
I know for a fact that my mother is creative -- I've seen evidence of it in her home. And I believe everyone is creative naturally, but some people just don't know how to access that creativity.
So I decided to give my mom some tools to jump-start her creativity and I concocted a gift for her:
A Creativity Toolbox
I put a quote in the bottom of the box by Wassily Kandinsky:
There is no must in art because art is free.
I raided my own stash of supplies for sequins, embroidery thread, and other embellishments. I added new paints, brushes and a palette tray.
I picked out some fun and pretty papers:
And then I made her a guidebook.
I threw in some more quotes from famous artists and added some tips on how to be creative:
And I made up some "rules."
I don't know if she'll ever use it, but I think she really liked it.
Monday, November 13, 2006
Almost Overlooked
As Al and I rushed out the door on Friday, heading to Philadelphia suddenly, he grabbed the mail. And I brought on the trip what I thought was some catalog from Flickr (since I just signed up for a Pro account, I thought maybe this was some sort of freebie publication on how to make the most of your Flickr account or something). But the side that said Flickr turned out to be the back, and an ad. And when I opened the plastic and really looked at the piece of paper covering the front of the publication, I realized it was volume 1 of Craft.
Monday Rain
I posted a comment, I think here, a while back, that we don't have rainy days here in Virginia, in the gray-ish, drizzling, sort-of-gloomy and sort-of-cozy, sense of rainy. It's been my experience that it pours here in sudden outbursts, and that's it. Ever since I posted that comment, the weather has done its best to prove me oh-so-wrong.
Today is a gray-ish, drizzling, sort-of-gloomy and sort-of-cozy rainy day, and I have just made a delicious cup of hot chocolate to celebrate that fact. Since I am too impatient today to wait for my favorite online book source, I just went to my local large bookstore, where I recently caved in and bought a membership card (since I used to work there, the membership benefits seem paltry compared to the employee discount, but since I no longer work there, since I don't know any good independent bookstores around here, and since my beloved local library lacks in one area -- up-to-date computer books, I knew I would get my money's worth out of the card), and purchased Photoshop 7 All-in-One Desk Reference for Dummies . I am very excited about this book, because, while I've always been an intuitive, figure-it-out kind of girl when it comes to computers, I don't find that Photoshop is intuitive. At least not for me. I've figured out the basics, but nothing complicated, and I am itching to know more.
So I will drink my hot chocolate and play around with photos all day. What a delightful way to spend a rainy day.
Today is a gray-ish, drizzling, sort-of-gloomy and sort-of-cozy rainy day, and I have just made a delicious cup of hot chocolate to celebrate that fact. Since I am too impatient today to wait for my favorite online book source, I just went to my local large bookstore, where I recently caved in and bought a membership card (since I used to work there, the membership benefits seem paltry compared to the employee discount, but since I no longer work there, since I don't know any good independent bookstores around here, and since my beloved local library lacks in one area -- up-to-date computer books, I knew I would get my money's worth out of the card), and purchased Photoshop 7 All-in-One Desk Reference for Dummies
So I will drink my hot chocolate and play around with photos all day. What a delightful way to spend a rainy day.
Thursday, November 09, 2006
Trees and Branches
I've been hard at work on a detailed business plan for weeks now -- it's the perfect thing to do while I can't paint or glue or have all my computer tools hooked up. And as I've been writing, which has been an incredible exploration of my plans and hopes for RadioGirl Designs and for myself, the one thing I've had trouble with was keeping all of the "branches" of my business in mind at once. That is, while I have been able to focus on details at length, I haven't been able to see the forest for the trees. Or... make that... see the tree for the branches.
So I decided to develop a visual business plan -- something I could hang on the wall and take in all at once without having to delve into pages of details. This is the prototype. I am very pleased with it and wanted to share.
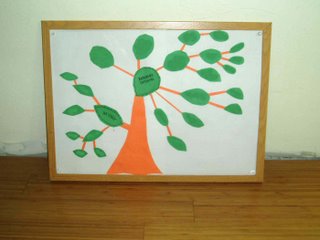
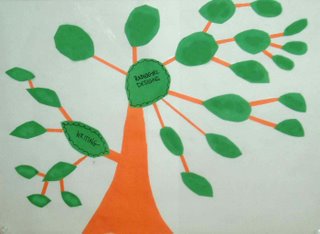
Forgive me for blurring out the words on the leaves. I am not being secretive, just sensitive. The branches of this business are still in the very early development stage, and I just want to nurture them a little bit longer before exposing them to close scrutiny.
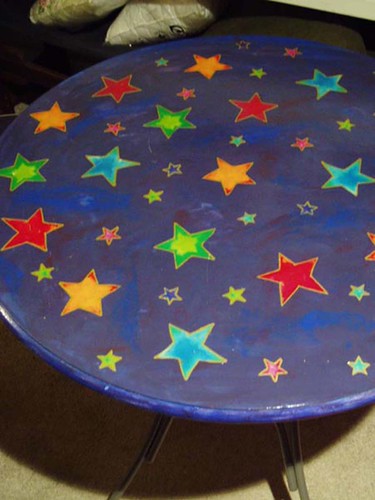
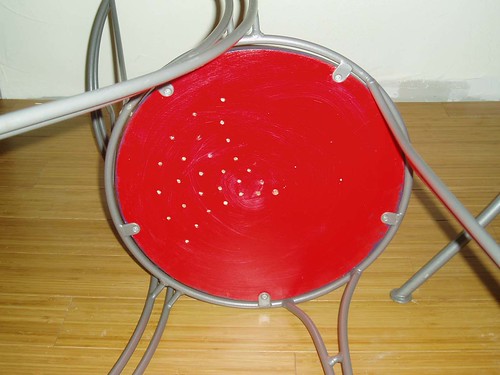
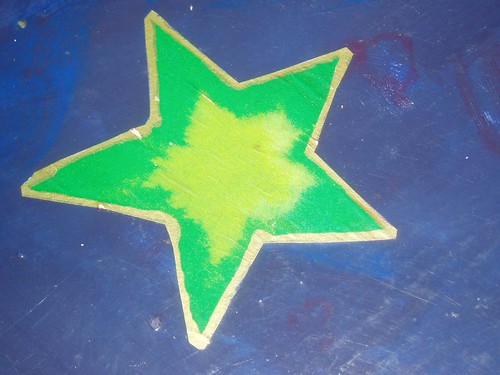
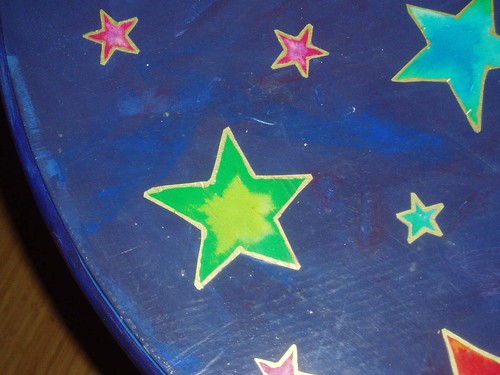
Oh, Starry Table, how I love thee
I am delighted and honored that Jules of Ikea Hacker invited me to write up the instructions for my star table. They are a little long, but they are in reality very simple, and I hope, inspiring. This is the project that, ahem, ruined me. That is, I cannot look at a piece of furniture anymore without wondering how I can make it better, more interesting, or totally mine.
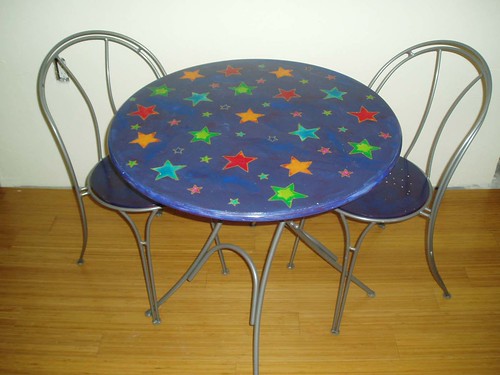
This was my first decoupage project ever and I did it on the fly with a few materials I was given for free. I just did it because I thought I could. I didn’t do a lot of research into decoupage, nor did I worry too much about the process as I was doing it. Since then, I have tried a variety of decoupage techniques, but I find the simpler, the better, and I tend to use these very same steps. I am always learning, though.
The table was a hand-me-down from someone who purchased it at Ikea, but I can’t find it any longer on the Ikea site and, sadly, I’m too far away to go look for myself. But these techniques should work with any wood furniture. If you're really attached to the furniture and/or a perfectionist, you may wish to practice on something else first.
Supplies needed:
table and chairs, sandpaper, paper cutouts to be decoupaged, gesso, acrylic paints, glue (Mod Podge or other decoupage glue), polyurethane, brushes
The simple steps:
1. Take everything apart and sand the wood.
2. Cover with gesso and then paint.
3. Glue paper shapes to the painted surfaces with mod podge.
4. Varnish with many layers of polyurethane.
The detailed steps:
Preparation:
1. Unscrew table top from base and chair seats from frames.
2. Lay the table top and seats on a tarp or other okay-to-get-paint-on-it surface.
3. Sand wood lightly.
Painting:
4. Cover all to-be-painted surfaces with gesso.
(If you’re unfamiliar with gesso, it’s acrylic primer found in art/craft stores and pronounced “jesso,” as I learned when I had to buy it the first time for myself and asked for “gesso” with a hard “g.” In my opinion, you don’t need expensive gesso, paint or brushes for this project. Buy them cheap. I used the cheap black foam brushes and threw them away when I was done.)
5. Paint all to-be-painted surfaces with as many coats as you need to achieve the hue you want. Let dry between each coat, unless you want to blend colors, in which case, apply the colors at the same time.
(I used only blue and red on this. I painted the underside of the table and chair seats red and let them dry. Then I painted the top surfaces with both colors: I mixed the blue and red on a tray to make purple, then blotched together red, blue and purple on the table, and blended them to get the look I wanted. I also went for a scratchy look, which has been great as I've moved the table from place to place - any dings looks sort of intentional. To know the drying time for each coat of gesso, paints, glue and polyurethane, read the manufacturer’s instructions.)

Decoupage:
6. Cut out the paper pieces while the paint dries.
(I cut these stars out of wrapping paper. I really like using wrapping paper, because it’s so thin that, if you get bubbles as the paper gets wet with glue, you can sort of crush them out with your hand. You will usually end up with a crinkly effect, but I like that look, and at the end, the finish will make the whole table very smooth to the touch. If you want it to look and be smooth from the start, try heavier paper and carefully smooth it out from the inside to the outer edge. If you use magazine cutouts, be warned that the text or images on the back might be visible through the paper.)
7. Spread Mod Podge or some other decoupage glue over the surface in a thin but total layer. Lay the paper pieces on the table in the arrangement you want. Spread another thin layer of the glue/podge on top of the paper pieces. Let that dry.
(If you do see bubbles you don’t want after the glue dries, the recommended technique is to cut a tiny “x” with a craft knife and push a little glue down there before putting the “x” back together so that the edges of the x overlap. I have tried this with mixed results. As for the glue, different decoupagers have their favorite products, such as wallpaper paste, spray adhesives and others. I like Mod Podge, and have not had any problems with it)
Finish:
8. Finally, I coated everything with three or four thin layers of polyurethane. This is the part of the process that takes the longest, because of drying times between coats.
(I used Anita’s Water Clean-Up Polyurethane and found that an 8 oz. jar was more than enough for this one project, but you can buy a gallon of polyurethane at a paint store if you like. The very best thing about this finish is that every time I’ve discovered a water ring or such on the table, I have just brushed another coat of polyurethane on the table and the mark has gone away.)
9. I recommend waiting at least 24 hours to use it even if the whole thing is dry to the touch.
Wednesday, November 08, 2006
Almost Finished...
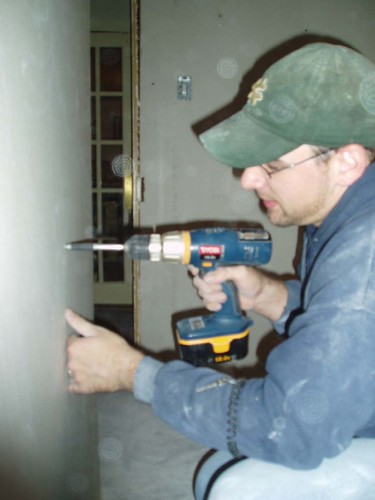
Well, the delay in finishing the studio/office renovations has lengthened by weeks thanks to Other Things Happening, but we have been working as hard as we can, and we are so close to being done, I can smell it. Oh, wait, that's the glue I'm smelling.
The last drywall screw goes in. Whew. I'm not saying I wouldn't hang drywall again. But I'm glad this batch is done.
This was before we realized the drywall tape really wasn't staying down.
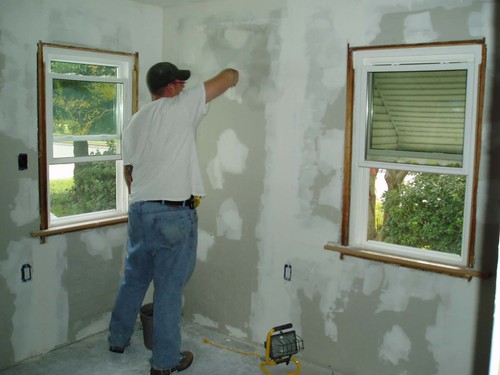
So we had to come up with a solution. And that was to make stucco! I like stucco. Stucco reminds me of California, which I miss every day. Now I have California inside. This is just the beginning of the finish, before the textured paint was added.

This is after -- and the best shot I have with a realistic depiction of "Honey Moon." Ah, so rich and warm and buttery and honey-like. And it has no lead in it, so if I get hungry, I can lick the walls. Which I might do. I like the paint that much.

There are tremendous benefits to being married to an electrician. One, he can teach me to do cool things, like installing outlets (me being a girl who shocked herself installing an extra phone jack). Two, if I don't feel like risking life and limb playing with wires, he'll do it. Thank you, honey.

The ceiling fan has a remote. Amazing. Of course, our ceilings are so low, I can touch them while barely even reaching, and the chain for the ceiling fan nearly brushes my head. But just in case my arm hurts, there's a remote.
 I don't think this looks like me, but I do think I look skinny in this picture, so I'll keep it.
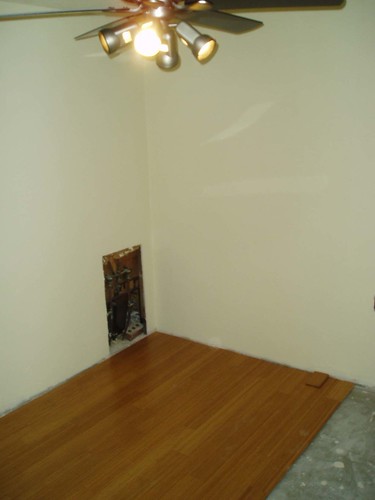
 Down goes the first row.

On Day One of floor-laying, we learned that two humongous tubes of glue don't go very far. We had to stop and then buy a CASE of glue tubes the next day.
This is where we are now. The last few rows have to be mitered to fit in with the strangely angled staircase, so we had to call it quits for the day. And now our plans will be postponed again as we must go out of town this weekend. But we're almost done.
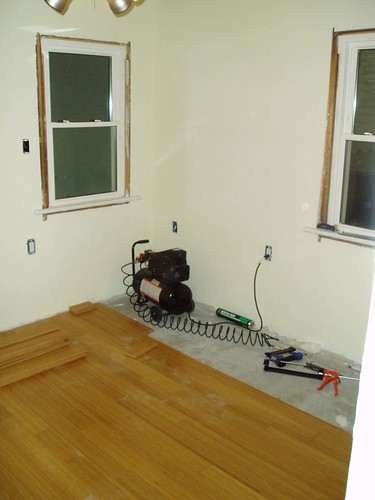 A complete set of photos can be found here. These aren't for the faint-hearted. There are 69 of them.
The last drywall screw goes in. Whew. I'm not saying I wouldn't hang drywall again. But I'm glad this batch is done.
This was before we realized the drywall tape really wasn't staying down.
So we had to come up with a solution. And that was to make stucco! I like stucco. Stucco reminds me of California, which I miss every day. Now I have California inside. This is just the beginning of the finish, before the textured paint was added.
This is after -- and the best shot I have with a realistic depiction of "Honey Moon." Ah, so rich and warm and buttery and honey-like. And it has no lead in it, so if I get hungry, I can lick the walls. Which I might do. I like the paint that much.
There are tremendous benefits to being married to an electrician. One, he can teach me to do cool things, like installing outlets (me being a girl who shocked herself installing an extra phone jack). Two, if I don't feel like risking life and limb playing with wires, he'll do it. Thank you, honey.
The ceiling fan has a remote. Amazing. Of course, our ceilings are so low, I can touch them while barely even reaching, and the chain for the ceiling fan nearly brushes my head. But just in case my arm hurts, there's a remote.
I don't think this looks like me, but I do think I look skinny in this picture, so I'll keep it.Down goes the first row.On Day One of floor-laying, we learned that two humongous tubes of glue don't go very far. We had to stop and then buy a CASE of glue tubes the next day.
This is where we are now. The last few rows have to be mitered to fit in with the strangely angled staircase, so we had to call it quits for the day. And now our plans will be postponed again as we must go out of town this weekend. But we're almost done.
A complete set of photos can be found here. These aren't for the faint-hearted. There are 69 of them.
Gocco Mania
I was sort of late learning about Print Gocco... in fact, the first time I ever heard about it included a link to the Save Gocco site, which I visited solely to find out what "gocco" was and why it was worth saving. And then I saw why people are sad. The whole idea of easily screen printing cards and other paper products in the comfort of my own home is delightful to me. Oh, the possibilities! So I, like so many others, it would seem, started searching online to see if I could get my hands on my own Gocco.
I've had no luck.
Well, that's not entirely true. I did see some for sale on eBay, and one had a "buy it now" price of $90, I think. I didn't buy it. I thought, WOW, that's a lot of art supplies right there, and I didn't click on the little button.
Part of me regrets that choice. The sales prices have been rising dramatically. The last auction I found just ended at more than $200. And no one, no one, is offering a "buy it now" option anymore.
But I think in the long run, I made the right choice. I read a letter that implies that Riso will have Gocco supplies available in the United States for three years, but based on what I've seen in my search, that three years will shrink dramatically as people start to panic and hoard supplies. So for a few hundred dollars in supplies (because, I admit, I'm a hoarder, too, and I'd want to stock up), and the ever-rising price of a Print Gocco machine, I, too could have a few years of fun.
And then it would be over.
So unless I happen to stumble across a Print Gocco at a garage sale somewhere, or just sitting, lonely, on a curb, if I am going to do any printing (which I most definitely plan to do) I will have to focus my energies on other techniques. I can always use potatoes.
Tuesday, November 07, 2006
Taking Care of Business
Grace Bonney, founder of Design*Sponge, shares some intriguing tips on how to handle prejudice faced as a woman in business on Slate's BizBox blog.
Design*Sponge is one of those blogs that I've bumped up against many times but only recently started reading regularly ... and I am so glad I have.
I find that many (certainly not all or even most, but many) art- and design-related blogs come across as stuffy, or snobby, or self-absorbed, even when it's clear that's not the author's intention at all (please don't think this means you, because I'm sure it doesn't). I know it's not easy to write to an unseen audience, to really be yourself, particularly when you desperately want those unseen people to like you and comment, and come back and keep coming back, and maybe even buy stuff... and because I am constantly struggling not to sound stuffy in my own writing, I am almost always willing to move right past the words to the content. But Grace manages to pull it off so that there is nothing to move past - the writing is fun, casual, and cheerful, and, yep, refreshing - and it never interferes with the content.
A Fun New Place
How I found this one I have no idea because it was a few days ago and I really must get better at tracking my internet browsing -- but whoever provided the link, I thank you, should you happen to be reading this entry.
Instructables
I am especially fond of the Altoids clock, the Mad Scientist's Light, and the LED Throwies, although at a cost of about $1 each (they say just under but it looks to me like just over $1 each), I'm not sure I'll be throwing them up around my neighborhood by the hundreds. Still, they're very pretty and appeal to my intertwined passions for light and color.
Experiments in Interdependence
Leave well enough alone? Oh, guess what. I am not capable of that. I must always tweak and alter and change.
So I am adding a blog to the RadioGirl web site family (and hope very soon to have one ring to rule them all... oh, sorry... I meant, one main web site with my own domain to be RadioGirl Headquarters... I'm working on it now).
Anyway, as I was saying, this new blog, I am RadioGirl, will be an offshoot of this "professional" blog, RadioGirl Designs. I am sometimes extremely disorganized, and sometimes organized to the point of overdoing it (overcompensation, you know), but in the long run, I think it will be easier if I keep the "random-thoughts-dreams-opinions-hilarious discoveries" and the "professional" stuff connected but still independent from each other... or perhaps the best word is interdependent.
It may become a bit of a hassle to maintain two blogs (three, actually, if you include my husband's and my personal blog, which is entirely separate), but I am looking forward to the challenge. This move will free me to write about things that I do want to share with others, but don't necessarily feel fit perfectly here on RadioGirl Designs. That is... this is the show, and that's
It's an experiment. One of my all-time favorite words. An experiment in interdependence.
(and if you pop over there now, you can read the story of the RadioGirl name...)
One exception to this separation of material will be the continuing renovation of my studio/office, which is very nearly done. I promise I will post more pictures here soon. Today, I hope. It looks amazing - better than I ever dreamed - and it is still visibly incomplete. I am bubbling with excitement and anticipation of how it will look when finished.
A Little Satisfaction
I just voted for the first time in Virginia. Voting always fills me with apprehension because I've lived and voted in so many places (and four states, now), that I am never quite sure what to expect as far as the location, procedure or machines. And I have this secret underlying fear that when I arrive, someone is going to jump up and point at me with a gnarled finger and yell in a craggy voice, "YOU! You can't vote!" I don't know why I have this fear; I've never done anything that would legally stop me from voting. But I get nervous all the same.
But today? Today was easy as instant pudding. The machine was fantastic (it even gave me a chance to preview my ballot when I was completely finished), and although the line was incredibly long (this at 6:30 in the morning), the actual ballot marking took me all of three minutes and half of that was making sure that I didn't mark the wrong thing. There is one very controversial state constitutional amendment on the ballot and one very close Senate race, and I wanted to be absolutely sure I voted the way I intended to.
And when it was all over, I had this feeling of warmth -- yeah, warmth -- and satisfaction and glee that I have a say in matters, even if I am lazy and don't get involved in political groups or campaign for issues like I feel I should. If nothing else, I cast my vote and I am proud.
The Story Behind the Name
I've been called many things in my life... most of them good, yes, but "RadioGirl" is one of the few I picked myself. It is derived from my actual name, pre-marriage. One day, in one of those flashes of amazement that happens to me frequently, seeing something that has been right in front of my face for a long time, I realized that my initials were A.M.F.M. (of course, I deserve a little lenience, because it is my confirmation name that added the middle "M," so I didn't grow up with these intials and it's not like I really could have noticed it all that much earlier than I did).
There's also a strong connection to actual radio broadcasting in my family's story, and - my mother says - to my own existence.
So, in spite of the fact that I, myself, worked in television for many years, but never in radio, the name fits well, my superhero alter ego.
There's also a strong connection to actual radio broadcasting in my family's story, and - my mother says - to my own existence.
So, in spite of the fact that I, myself, worked in television for many years, but never in radio, the name fits well, my superhero alter ego.
Subscribe to:
Posts (Atom)